
For those of us with road bikes, a fresh layer of bar tape each season is a nice little treat. Next in our series of cycling self sufficiency is how to tape your bars.

Today I’ll be working on the 2013 Madone 2.1. I’ve taken the existing tape off already. A little tape goop left on the bar isn’t going to hurt anything, by the way.

To prep, fold the shifter hoods out of your way, and make sure the brake and shift cables are tightly taped down.

Tools of the trade. You only need a box of tape, such as Bontrager gel cork handlebar tape, some scissors, and some electrical tape to wrap your handlebars. Your package of bar tape should include two rolls of tape, two pieces of cheater tape (little strips of bar tape on the right), two pieces of cosmetic finishing tape(on the left), and two bar plugs. Keep the scissors and tape near, they always seem to be just out of reach when you need them at the end.

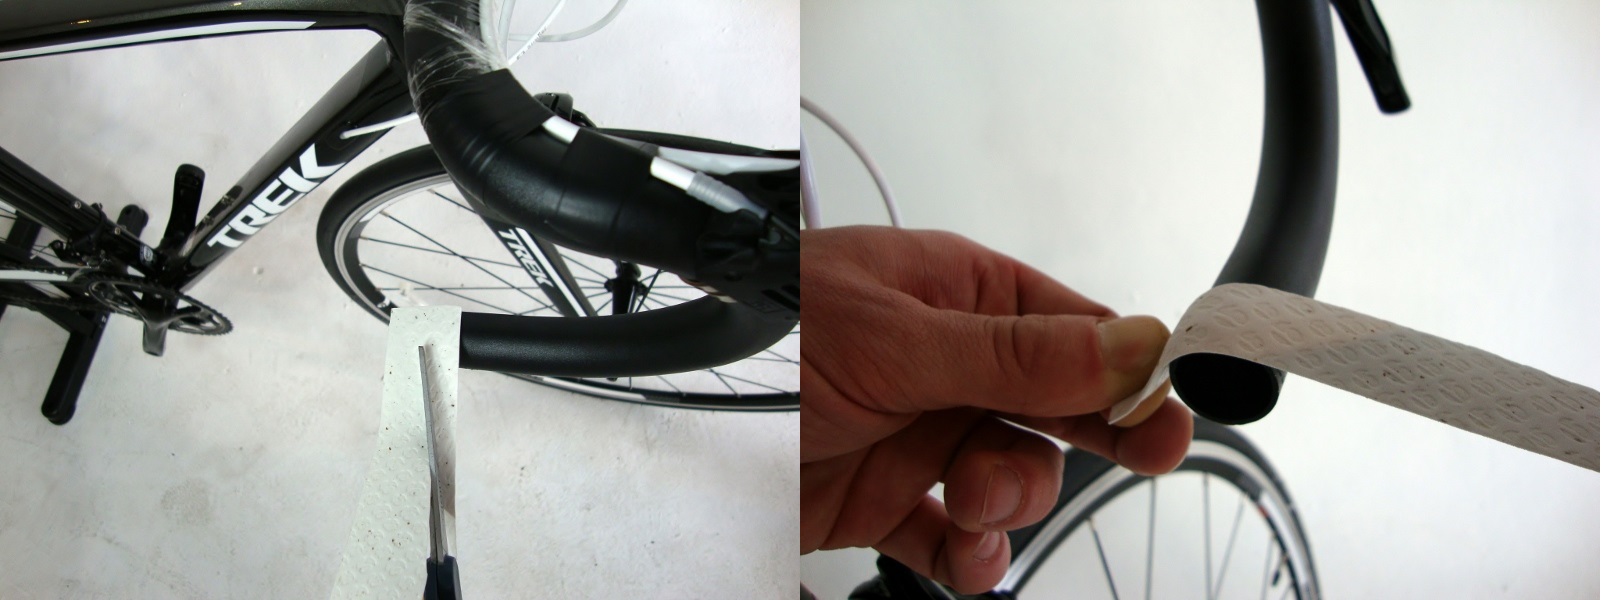
Starting can be tricky, take note which side of the tape I am trimming here. The goal is to tuck the thin factory edge of the tape into the bar, so cut a taper into the edge that does not overlap the end of the bar.

Overlap by about half an inch. Let’s talk tension: Give the tape a tug, this stuff is pretty stretchy, so get a quick feel for it. You’ve gotta put a little tension on it as you wrap, or it will unwind. Too much tension will stretch the tape thin however, so don’t kill it.

Here, we have a choice to make. I can overlap more than half the tape (see left) for a thicker wrap, or I can just overlap a little (right) for a thinner wrap. Aiming for exactly half a tape width of overlap is the happy medium that most bike mechanics shoot for. Keep in mind, if you wrap it too thick you won’t have enough tape to finish, so don’t get too greedy for comfort. Whatever you pick, try to stick to it the for the whole bar. I try to make a visual marker using the pattern on the tape to try to keep consistent overlap.

Doing the curves isn’t too tricky. Look how things overlap a little less on the outside of the curve, and the wrap gets tighter on the inside of the curve. Here, consistency throughout the curve is more important than consistency across the whole handlebar, I try to keep the inside of the curve even.

Keep going until you get half a tape width from the hood (see arrow). Our next goal is to get the tape wrapped around the back of the hoods with no exposed bar. We have two ways to do this: We can wrap our cheater strip around the back of the shifter to cover up the exposed space, and then continue wrapping the bar like usual. Or, we can do the figure eight around the shifter. Cheater strips are easier, and use less tape (important with a large bar or short tape). The figure eight is more pro, and doesn’t loosen up when you ride the drops often.

To use the cheater strips, fold the strip around the back of the handlebar, behind the shifter. The strip needs to cover the steel clamp for the shifter. It will be tucked under the rubber shift hood when you are done. The adhesive on the strip rarely holds in in place, so I like to hold onto it until I have the first layer of tape around it. Note how I overlap edges of the shifter with the tape just a little, so there’s no bare spots.

Doing the eight is a little trickier, make sure to enlarge the picture above for a better look. Leaving the gap below the shifter, I’ll first pull the tape up over the bar, covering as much of the silver shifter clamp as possible (left). The figure eight happens when I loop the tape around the back of the bar, and down below the shifter again, doing my best to get the shifter clamp completely covered now (middle). Finally, I go back on the top of the bar, and I’m back to wrapping as normal (right). If this is your first time, take a moment the flip the hood back down, and see if you’ve completely covered the handlebar with tape before you continue. If there’s a bare spot, unwind and try it again.

No tricks to trimming the tape here, just remember there’s no need to get a knife point here. Make sure to lock it down with the electrical tape (that you kept close) before you put the cosmetic strip down.

Plug the end of the bars, and you are good to go that is how you wrap your handlebars.
For more information or help talk to a bike expert at Village Cycle Center today. Also check out our website for our full selection of handlebar tape. We have several options and many colors!

0 Comment